Indoor air quality has a significant impact on your health, comfort, and overall well-being. Most people spend up to 90% of their time indoors — whether at home, school, or work — making clean indoor air more important than ever. Unfortunately, many airborne pollutants are invisible and odourless, which means they can go unnoticed until they start causing health problems. If you’ve been wondering how to test air quality in your home, you’re already taking the first step toward creating a healthier living environment.
In this blog, we’ll walk you through everything you need to know about testing air quality in your home — from the types of pollutants to look out for, to different testing methods you can use.
Why Air Quality Matters

Indoor air pollution can come from many sources, including dust, mould spores, cleaning products, pets, gas appliances, and even building materials. Poor air quality can lead to respiratory problems, fatigue, headaches, sinus irritation, and in more serious cases, long-term health issues like asthma or cardiovascular disease.
Children, elderly individuals, and those with pre-existing health conditions are particularly vulnerable to the effects of indoor pollutants. That’s why regular air quality testing should be a priority in every household.
Signs of Poor Indoor Air Quality
Before testing your air, it helps to identify common symptoms that may suggest a problem:
- Frequent coughing, sneezing, or irritated eyes
- Excessive dust build-up around vents or furniture
- Mouldy or musty odours
- Unexplained allergy symptoms that improve outside the home
- Condensation on windows or walls
- Stale or stuffy air
If you notice any of these signs, it could indicate the presence of airborne contaminants.
Common Indoor Pollutants to Test For
Testing the air in your home means looking for specific contaminants. Here are the most common pollutants to keep in mind:
1. Volatile Organic Compounds (VOCs)
These are emitted by everyday products like paints, cleaning supplies, adhesives, and even furniture. Long-term exposure can cause chronic health effects.
2. Carbon Monoxide (CO)
A colourless, odourless gas that can be deadly at high concentrations. It’s often produced by malfunctioning gas stoves, heaters, and fireplaces.
3. Mould Spores
Indoor mould can trigger allergies and respiratory issues. It typically thrives in damp or humid areas such as bathrooms, basements, or near plumbing leaks.
4. Particulate Matter (PM2.5 and PM10)
Tiny airborne particles, such as dust, pollen, smoke, and pet dander, can aggravate asthma and other respiratory conditions.
5. Formaldehyde
Commonly found in building materials and pressed-wood furniture. It can cause throat irritation, skin rashes, and even cancer with long-term exposure.
How to Test Air Quality in Your Home
There are several ways you can test the air quality in your home, ranging from DIY tools to professional inspections. Below, we outline the most effective methods:
1. Use a Home Air Quality Monitor
An indoor air quality monitor is a device that detects pollutants in real-time. Most consumer-grade models measure VOCs, carbon dioxide (CO₂), particulate matter, and humidity. They’re easy to use and can provide valuable insights, especially when placed in high-traffic or problem-prone areas like kitchens, living rooms, or basements.
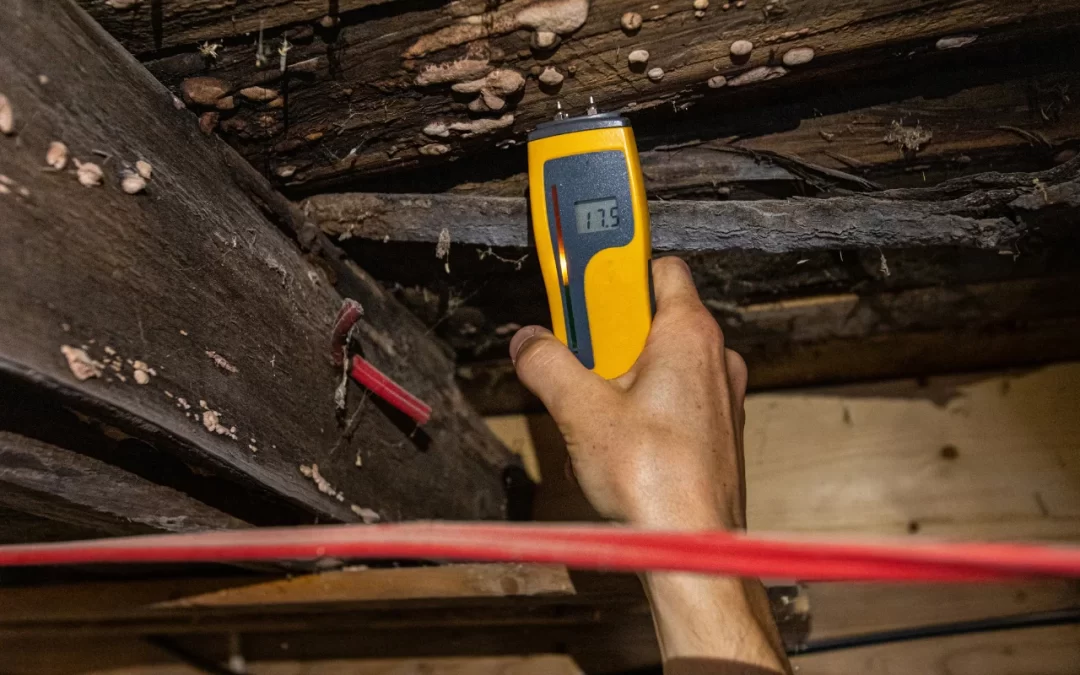
2. Conduct a Mould Inspection
Mould can be tricky to detect, especially if it’s hidden inside walls or under flooring. While visible mould growth is a clear warning sign, professional testing is often needed to confirm its presence and determine the type of spores. Sampling methods include:
- Air Sampling: Tests airborne spores throughout your home.
- Surface Sampling: Swabbing or taping surfaces where mould is suspected.
- Bulk Sampling: Removing portions of suspected material for lab analysis.
If you suspect mould is an issue, it’s best to consult professionals to ensure the results are accurate and actionable.
3. Check for Asbestos (If Applicable)
If your home was built before the 1990s, there’s a possibility it contains asbestos — a harmful material once commonly used in insulation, roofing, and flooring. Asbestos is dangerous when disturbed, so testing should only be performed by certified professionals.
Learn more about asbestos detection and its risks by visiting our guide on how to test for asbestos.
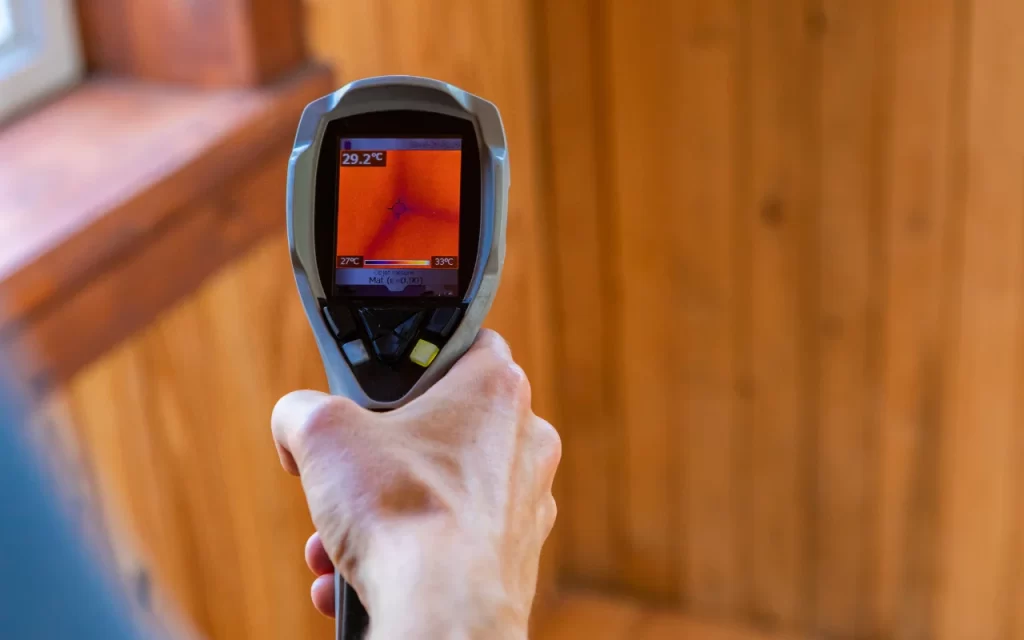
4. Professional Indoor Air Quality Testing
While DIY monitors are useful, they have limitations. A professional indoor air quality assessment provides a comprehensive analysis that can identify hidden or complex issues.
At Enviro Health, we specialise in expert air quality testing and offer detailed reports that highlight problem areas and recommended actions. Our team uses advanced equipment to assess a wide range of pollutants — from carbon monoxide and mould spores to humidity levels and VOC concentrations.
You can explore our professional air quality testing services for more detail on how we work.
What to Expect From a Professional Inspection
When you contact us for an indoor air quality assessment, here’s what typically happens:
- Initial Consultation: We’ll ask questions about your home, its history, and any symptoms you or your family members are experiencing.
- On-Site Evaluation: Our team will inspect your property, test air samples, and look for signs of mould, asbestos, VOCs, and more.
- Lab Analysis: In cases where more detailed testing is needed, samples may be sent to a laboratory.
- Results & Recommendations: You’ll receive a detailed report with clear findings, and we’ll provide practical steps to improve your indoor environment.
For a broader overview of our services, visit our indoor air quality services page.
How to Improve Indoor Air Quality After Testing
Once testing is complete, taking the following steps can significantly improve the air you breathe:
1. Increase Ventilation
Open windows regularly and use exhaust fans in kitchens and bathrooms. Consider installing a heat-recovery ventilator (HRV) to maintain airflow without losing indoor warmth.
2. Use Air Purifiers
High-efficiency particulate air (HEPA) filters can help capture small particles, including allergens and mould spores.
3. Control Humidity
Keep indoor humidity between 30% and 50% to prevent mould growth. Use dehumidifiers in damp areas and fix any leaks immediately.
4. Avoid Smoking Indoors
Cigarette smoke is a significant indoor pollutant and can linger for days. Create a smoke-free policy for your home.
5. Switch to Natural Cleaning Products
Reduce exposure to VOCs by using eco-friendly or fragrance-free cleaning supplies.
When to Test Again
Indoor environments can change with seasons, renovations, or new appliances. It’s a good idea to test air quality:
- Annually, as part of routine maintenance
- After home renovations or construction work
- If someone in the household develops unexplained health issues
- After floods or water damage
- When purchasing a new home
Taking Charge of Your Indoor Environment
Air quality is not something we can see, but its impact on our health is very real. By learning how to test air quality in your home, you’re taking an important step toward protecting your loved ones and enhancing your daily comfort.
Whether you’re dealing with dust, mould, or more complex concerns like asbestos or chemical exposure, professional testing can help you get the answers you need. At Enviro Health, we take pride in offering scientifically backed, highly accurate assessments that go beyond surface-level checks. We believe everyone deserves to breathe clean, safe air in their own home.
For peace of mind and professional guidance, don’t hesitate to contact us for a full indoor air quality assessment.